Introduction and Quick Summary
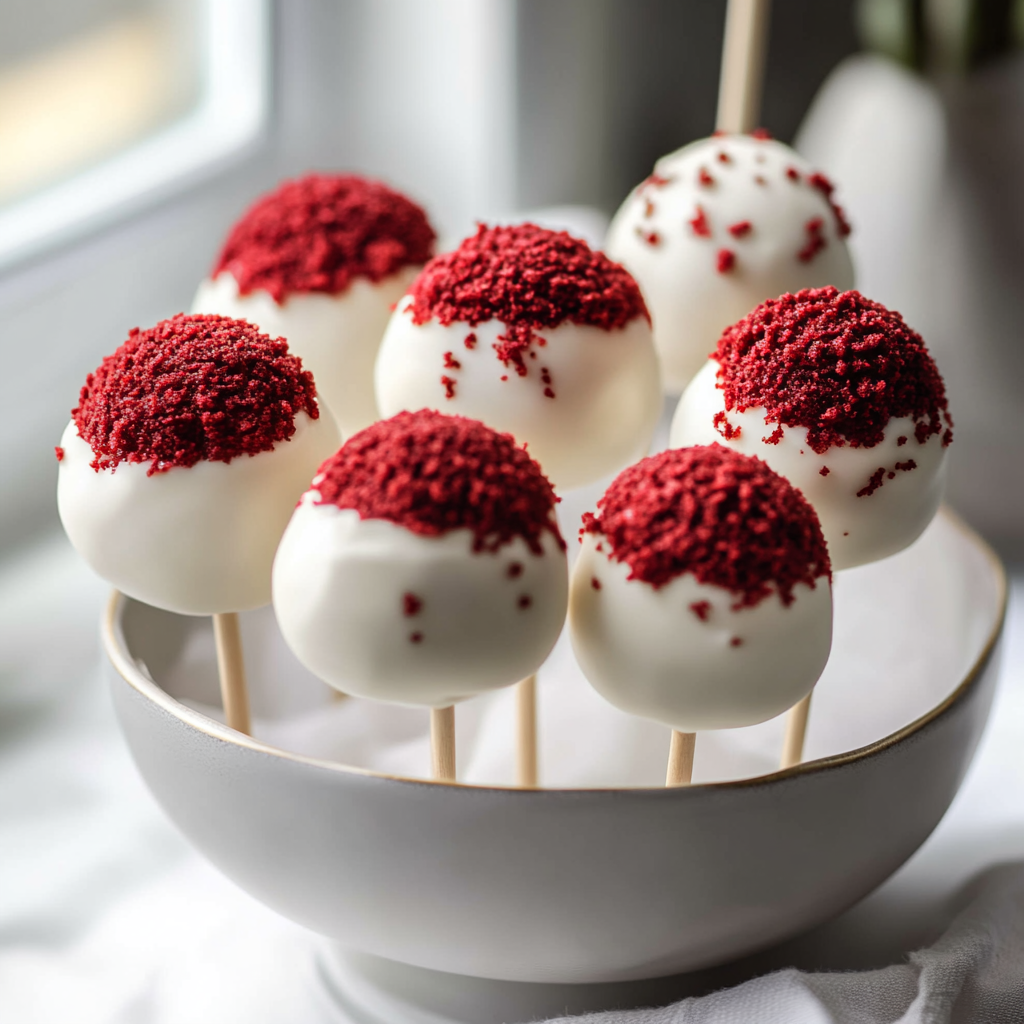
If you’re looking for a delightful treat that combines the classic flavors of red velvet cake with an easy-to-eat form, then this recipe for Red Velvet Cake Pops is just what you need. These bite-sized desserts are not only visually stunning with their vibrant red color but also incredibly tasty and perfect for any occasion. Whether it’s a birthday party, wedding reception, or simply a fun dessert night at home, these cake pops will impress your guests and satisfy your sweet tooth.
Making Red Velvet Cake Pops is easier than you might think. This recipe breaks down everything you need to create these mouthwatering treats from scratch. You’ll learn about the core ingredients that give these cake pops their unique flavor and texture. Plus, we’ll guide you through step-by-step instructions to ensure your cake pops turn out perfectly every time. The best part? They can be customized with various toppings and decorations to match your theme or personal taste.
So roll up your sleeves and get ready to indulge in the delightful world of homemade desserts. With a little patience and creativity, you’ll be serving up stunning Red Velvet Cake Pops that are sure to be the star of any gathering!
Main Ingredients
All-Purpose Flour
All-purpose flour serves as the base for your Red Velvet Cake Pops. You will need 2 cups for this recipe. This flour provides the necessary structure to hold all the ingredients together while maintaining a light texture that makes each bite enjoyable. Sifting the flour before measuring can help prevent clumping and ensure even mixing.
Granulated Sugar
Granulated sugar adds sweetness to your cake pops. For this recipe, use 1 cup of sugar. It not only sweetens the batter but also contributes to the overall texture of the cake by helping it rise during baking. The sugar dissolves during mixing, creating a smooth batter that helps achieve that classic red velvet flavor profile.
Unsweetened Cocoa Powder
You’ll need 1 tablespoon of unsweetened cocoa powder to give your Red Velvet Cake Pops their signature chocolate undertone. This ingredient complements the rich flavors of vanilla and red food coloring while keeping the dessert balanced in taste. Make sure to use high-quality cocoa powder for the best results.
Baking Powder and Baking Soda
For leavening purposes, include 1 teaspoon of baking powder and 1 teaspoon of baking soda in your ingredient list. Both of these agents work together to make your cake light and fluffy by producing carbon dioxide during baking. It’s essential to measure these accurately since they significantly affect the texture of your cake pops.
Salt
A pinch of salt (about ½ teaspoon) enhances all flavors in your cake pops while balancing sweetness. It’s crucial not to skip this ingredient as it helps bring out the richness of chocolate and vanilla flavors in every bite.
Buttermilk
Buttermilk is essential for both moisture and tanginess in your batter—use 1 cup for this recipe. Its acidity reacts with baking soda to contribute to leavening while giving a subtle flavor depth that complements the cocoa powder nicely.
Vegetable Oil
Using ½ cup of vegetable oil adds moisture without weighing down the batter as butter would do. Oil helps keep your cake pops moist even after cooling down while making them easier to mix into a smooth batter.
Eggs
Two large eggs are required for binding ingredients together within the batter while providing additional moisture content as well as protein structure needed during baking.
Vanilla Extract
Vanilla extract adds aromatic depth—a must-have flavor component! Use 1 tablespoon for an irresistible hint that enhances each pop’s overall taste experience beautifully.
Red Food Coloring
The star ingredient—red food coloring! You’ll need about 2 tablespoons; this not only gives your cake its beautiful crimson hue but also contributes subtly sweet notes when combined properly with other elements present within this delightful treat’s recipe!

How to Prepare Red Velvet Cake Pops
Step 1: Preheat Your Oven
Before beginning any mixing or preparation steps, preheat your oven to 350°F (175°C). This allows sufficient time for it to reach optimal temperature while you prepare your batter. Ensuring an adequately heated oven is vital because it helps achieve even cooking throughout every delicious morsel without over-baking or drying out those precious red velvet creations!
Step 2: Mix Dry Ingredients
In a medium bowl, sift together all-purpose flour, cocoa powder, baking powder, baking soda, and salt until well combined—this process aerates these components ensuring an even distribution throughout the final mixture which ultimately leads towards achieving ideal textures later on during baking! Set aside once done so you can focus on wet ingredients next.
Step 3: Combine Wet Ingredients
In another large bowl combine granulated sugar with vegetable oil whisking until blended thoroughly followed by adding eggs one at a time mixing thoroughly after each addition; next add buttermilk along with vanilla extract into mixture stirring until fully incorporated resulting in lovely creamy consistency before gradually introducing dry mixture previously set aside blending gently until just combined being careful not overmix as this may toughen final product!
Step 4: Add Food Coloring
Now comes time for that iconic vibrant hue! Gradually add red food coloring into batter carefully mixing until desired shade achieved—remember brighter shades yield more striking outcomes! Once satisfied pour prepared mixture evenly into greased or lined baking pans ensuring each layer reaches nearly halfway full allowing room for rising during cooking phase without overflowing messes occurring inside ovens unexpectedly!
Step 5: Bake Cakes
Place pans inside preheated oven allowing them bake approximately thirty minutes checking doneness using toothpick test inserted centrally—if it emerges clean without sticky residue attached consider them finished otherwise allow extra few minutes before checking again until perfection reached! Once baked remove from heat source letting cool completely before moving onto next steps involving crumbling those beautiful layers down into delightful bites ready forming delectable pops!
Step 6: Crumble & Mix With Frosting
Once cooled adequately crumble cakes by hand into fine crumbs placing within separate bowl then fold store-bought cream cheese frosting mixture allowing enough coverage over crumbs creating cohesive dough-like mixture shaping easily afterward rolling portions into small balls around one inch diameter setting aside onto parchment-lined tray repeating process until all dough formed appropriately!
Step 7: Insert Sticks & Chill
Next insert lollipop sticks directly into each rounded ball halfway through ensuring stability during later stages once chilled; place trays inside refrigerator allowing at least thirty minutes rest period providing time needed firming up slightly prior dipping phase commencing afterwards preparing coatings accordingly!
Step 8: Melt Chocolate Coating
To create outer layer melt white chocolate chips using microwave-safe bowl heating short intervals stirring intermittently—this will yield silky smooth consistency perfect adhering onto surface area once dipped; alternatively consider colored candy melts if desiring additional flair atop those gorgeous bites showcasing creativity alongside taste sensations experienced earlier throughout entire process journey leading here today!
Step 9: Dip & Decorate
Carefully dip chilled pops into melted chocolate coating twirling gently ensuring thorough coverage; allow excess drip back before placing upright on stand or styrofoam block letting dry completely—if using sprinkles add immediately after dipping while still wet ensuring adherence remains intact bringing festive vibes directly onto plates served later when guests arrive eager indulging themselves finding satisfaction upon each flavorful bite enjoyed wholeheartedly!

Serving and Storing Tips
Serving Suggestions
When serving your Red Velvet Cake Pops consider presentation first! Place them decoratively arranged upon platters garnished with fresh mint leaves or edible flowers elevating visual appeal instantly capturing attention among guests gathered nearby eager sampling whatever delights await! For added flair consider pairing accompanying sauces such as raspberry coulis drizzled artfully around edges enhancing aesthetics whilst providing contrasts unexpected flavors delightfully surprising palates experiencing these treats’ charm firsthand!
Storage Guidelines
To maintain freshness store uneaten cake pops inside airtight containers; preferably refrigerate if planning on enjoying later within few days maximum extending shelf life considerably preventing spoilage due warmth environments often found elsewhere unless consuming immediately following creation process finished entirely! Freezing option exists too where wrapped individually placing zip-top bags protecting against freezer burn allowing enjoyment beyond initial window timeframe extending indulgences long after celebrations concluded leaving lingering memories behind forever cherished moments shared amongst family friends alike enjoying delicious experiences crafted lovingly within kitchens everywhere worldwide!
By following these detailed instructions along with proper storage methods mentioned above enjoy every moment relishing those luscious bites called Red Velvet Cake Pops indulging senses stimulating taste buds endlessly inviting smiles guaranteed arriving wherever served making occasions truly memorable festivities celebrated across generations timelessly continuing traditions surrounding deliciousness felt universally connecting us through culinary delights created together lovingly shared amongst loved ones everywhere around us daily celebrating life moments fully embraced wholeheartedly!
Mistakes to avoid
When making Red Velvet Cake Pops, several common mistakes can undermine the final product. One of the primary issues is overmixing the batter. When you overmix, it can lead to a dense and dry cake pop instead of a moist and fluffy treat. To avoid this, mix just until the ingredients are combined and no lumps remain.
Another frequent mistake is using the wrong type of food coloring. Red Velvet Cake requires a specific kind of red food coloring, preferably gel-based, to achieve that vibrant hue without altering the cake’s texture. Liquid food coloring can add too much moisture and affect the consistency.
Additionally, not allowing the cake pops to cool completely before dipping them in chocolate can cause a mess. If they are still warm, the chocolate coating will melt and run off, creating a gooey disaster rather than a beautiful cake pop. Always let them cool fully on a wire rack.
Lastly, don’t skip using vegetable shortening or oil in your chocolate coating. This helps create a smoother consistency for dipping and prevents cracking as they set. If you omit this step, you might end up with unevenly coated pops that don’t look as appealing.

Tips and tricks
Creating perfect Red Velvet Cake Pops involves more than just following a recipe; implementing some essential tips can make all the difference. First, ensure your cake is baked properly. Check for doneness by inserting a toothpick into the center; it should come out clean or with just a few crumbs attached.
Once your cake has cooled, crumble it finely before mixing it with frosting. This step is crucial because large chunks can lead to uneven texture in your cake pops. Use your hands or a fork to break it down into fine crumbs.
Additionally, use a cookie scoop for even portions when shaping your cake pops. This tool ensures each pop is uniform in size, which results in even baking and presentation once dipped in chocolate.
While dipping your cake pops in chocolate, consider using a tall glass instead of a bowl; this allows for easier dipping and less chance of drips running down the sides after pulling them out.
Lastly, refrigerate your formed cake pops before dipping them into chocolate. Chilling helps them hold their shape better during the coating process and prevents them from falling off the sticks.
Suggestions for Red Velvet Cake Pops
When making Red Velvet Cake Pops, consider adding unique flavors or decorations to elevate their appeal. For instance, you could infuse cream cheese frosting with lemon zest to give an unexpected twist that pairs beautifully with red velvet’s rich flavor.
Experimenting with various coatings can also enhance your treats; try using white chocolate or butterscotch chips alongside traditional chocolate for added variety. These alternatives provide different flavors while maintaining that delightful sweetness.
In terms of decoration, consider rolling your finished pops in crushed nuts or sprinkles for added texture and color contrast. This not only makes them visually appealing but also adds an extra crunch that complements the soft interior wonderfully.
For those who enjoy baking seasonal treats, consider pairing these cake pops with themed decorations or colors during holidays such as Valentine’s Day or Christmas. For example, red and pink sprinkles are perfect for Valentine’s Day festivities.
Finally, package these delicious treats creatively if you plan to gift them. Use clear treat bags tied with ribbons or decorative boxes to make your dessert gifts stand out while keeping them fresh.

FAQs
What makes Red Velvet Cake Pops different from regular cake pops?
Red Velvet Cake Pops stand out due to their unique flavor profile derived from cocoa powder combined with buttermilk and vinegar which creates that signature tanginess associated with red velvet cakes. The distinct red hue also adds visual appeal that makes these treats perfect for special occasions such as birthdays or weddings compared to standard vanilla or chocolate variants.
How do I store Red Velvet Cake Pops?
To ensure freshness, store Red Velvet Cake Pops in an airtight container at room temperature for up to three days. If you want them to last longer, place them in the fridge where they can remain fresh for about two weeks. For longer-term storage, freeze uncoated cake balls tightly wrapped in plastic wrap; simply thaw before dipping when you’re ready to coat them.
Can I use gluten-free flour for my Red Velvet Cake Pops?
Yes! You can substitute all-purpose flour with gluten-free flour blends designed for baking without sacrificing taste or texture significantly when preparing Red Velvet Cake Pops. Ensure that you follow other ingredient proportions carefully since some gluten-free flours may require adjustments regarding liquids used in your recipe.
How do I achieve vibrant color in my Red Velvet Cake Pops?
Using high-quality gel food coloring is essential for obtaining that bright red hue characteristic of classic red velvet cakes without affecting their texture adversely compared to liquid food colorings which may add unnecessary moisture leading potentially drier results overall while baking!
What is the best way to decorate my Red Velvet Cake Pops?
Decorating your Red Velvet Cake Pops doesn’t have to be complicated! Rolling them in crushed nuts or colorful sprinkles adds both taste and visual appeal effortlessly! You could also drizzle contrasting melted chocolates on top or add edible glitter for an eye-catching finish suitable for celebrations!
Can I make vegan Red Velvet Cake Pops?
Absolutely! Vegan versions of these delicious treats are achievable by replacing eggs with flaxseed meal mixed with water as well as substituting dairy products like buttermilk using plant-based milk mixed slightly with vinegar! With proper adjustments made throughout preparation processes—vegan options will still deliver delightful flavors expected from classic recipes!
Conclusion
In summary, creating delightful Red Velvet Cake Pops involves paying attention to detail throughout each step of preparation and execution—avoiding common mistakes like overmixing ingredients while ensuring proper cooling times before coating enhances taste considerably! Implementing useful tips such as using uniform portions aids consistency leading towards aesthetically pleasing results too!
Adding personal touches through flavor variations alongside creative decorations sets these treats apart from typical sweets offered at gatherings—making every bite memorable! With proper storage methods considered carefully afterwards—enjoying freshly prepared indulgences becomes achievable long after celebrations conclude—a sweet reminder left behind!
Print
Red Velvet Cake Pops
- Author: Sofia
- Total Time: 50 minutes
- Yield: 20 cake pops 1x
Description
These Irresistible Red Velvet Cake Pops are the perfect combination of rich, moist red velvet cake and creamy frosting, all dipped in smooth chocolate coating. These bite-sized treats are fun, festive, and absolutely delicious, making them a perfect treat for any occasion!
Ingredients
- For the cake:
- 1 box red velvet cake mix (or homemade recipe)
- 3 eggs
- 1/2 cup vegetable oil
- 1 cup water
- 1 tsp vanilla extract
- For the frosting:
- 1/2 cup cream cheese, softened
- 1/4 cup unsalted butter, softened
- 1 cup powdered sugar
- 1 tsp vanilla extract
- For the coating:
- 12 oz white or dark chocolate (for dipping)
- Lollipop sticks (optional)
- Sprinkles or edible glitter (optional)
Instructions
- Bake the cake: Preheat the oven to 350°F (175°C). Prepare the cake mix according to the package instructions (or your homemade recipe), then bake in a 9×13-inch pan. Let the cake cool completely.
- Make the frosting: In a mixing bowl, beat together the softened cream cheese, butter, powdered sugar, and vanilla extract until smooth and fluffy.
- Crumb the cake: Once the cake is cool, crumble it into fine crumbs using your hands or a fork in a large bowl.
- Combine with frosting: Gradually mix in the cream cheese frosting until the crumbs are moistened and the mixture holds together when pressed.
- Form the cake pops: Roll the mixture into 1-inch balls, gently pressing to ensure they hold together.
- Coat the sticks (optional): If using lollipop sticks, dip the tip of each stick into the melted chocolate, then insert it into the center of each cake ball. This will help the stick stay in place.
- Dip in chocolate: Melt the white or dark chocolate in a microwave-safe bowl or using a double boiler. Dip each cake pop into the chocolate, making sure it’s fully coated. Tap gently to remove any excess.
- Chill and decorate: Place the cake pops on a parchment-lined tray and refrigerate for about 30 minutes to set. If desired, decorate with sprinkles or edible glitter.
- For a smoother coating, make sure the chocolate is melted properly and at the right temperature.
- Store cake pops in an airtight container in the refrigerator for up to 5 days.
Notes
- For a smoother coating, make sure the chocolate is melted properly and at the right temperature.
- Store cake pops in an airtight container in the refrigerator for up to 5 days.
- Prep Time: 20 minutes
- Cook Time: 30 minutes


