Introduction and Quick Summary
Oreo cheesecake is a delightful dessert that combines the rich flavors of cream cheese with the iconic taste of Oreos. This no-bake treat is perfect for any occasion, from birthday parties to casual family gatherings. Imagine biting into a slice of creamy cheesecake adorned with crushed Oreos and velvety chocolate ganache drizzled on top. It’s not just a dessert; it’s an experience that everyone will love.
In this article, we will guide you through the process of making a mouthwatering Oreo cheesecake that will impress your friends and family. We’ll provide clear instructions and tips to ensure your cheesecake turns out perfectly every time. Whether you’re an experienced baker or a kitchen novice, you’ll find this recipe easy to follow. So grab your ingredients and let’s get started on creating this decadent treat that will surely become a favorite in your household!
Main Ingredients
Cream Cheese
Cream cheese serves as the base for our Oreo cheesecake, giving it that rich and creamy texture we all crave in a dessert. You’ll need 16 ounces of full-fat cream cheese for the best results. Make sure it’s softened at room temperature before mixing; this ensures it blends smoothly without lumps. The cream cheese provides not only flavor but also structure to the cake, allowing it to hold its shape once chilled.
Sugar
For sweetness, we’ll use 1 cup of granulated sugar. This ingredient balances the richness of the cream cheese while enhancing the overall flavor profile of the cheesecake. It’s crucial to mix the sugar well with the cream cheese until fully combined to avoid any grainy texture in your final product.
Sour Cream
Adding 1 cup of sour cream contributes moisture and tanginess to our Oreo cheesecake. The acidity of sour cream complements the sweetness while adding depth to the flavor. Ensure you use full-fat sour cream for optimal richness and creaminess in your dessert.
Heavy Whipping Cream
To achieve that luscious, airy texture in our cheesecake filling, you’ll need 1 cup of heavy whipping cream. Whip it until soft peaks form before folding it into the mixture. This step is vital as it adds lightness and helps create a fluffy consistency that melts in your mouth.
Oreos
No Oreo cheesecake would be complete without Oreos! You’ll need about 24 cookies for both crust and filling purposes. Crush half of them into fine crumbs for the crust while keeping the other half roughly chopped to mix into the filling. This combination delivers that classic cookies-and-cream flavor throughout every bite.
Butter
To bind our cookie crumbs together for the crust, you’ll require ½ cup (1 stick) of melted unsalted butter. The butter brings richness to the crust while ensuring it holds its shape when pressed into the pan. Be sure not to skip this step; an ideal crust depends heavily on using enough butter.

How to Prepare Oreo Cheesecake
Step 1: Prepare Your Crust
Start by preheating your oven to 350°F (175°C). In a medium bowl, combine crushed Oreos with melted butter until thoroughly mixed. The mixture should resemble wet sand; if it feels too dry, add more melted butter gradually until you reach this consistency. Press this mixture firmly into the bottom of a 9-inch springform pan using either your fingers or a measuring cup for even distribution. Once done, bake it for about 10 minutes until set but not browned. Remove from oven and allow it to cool completely before adding your filling.
Step 2: Make Your Filling
In a large mixing bowl, beat softened cream cheese with granulated sugar using an electric mixer on medium speed until smooth and creamy—about two minutes should suffice for proper blending without lumps forming. Next, incorporate sour cream until well combined followed by vanilla extract which enhances flavors beautifully! Once mixed thoroughly, gently fold in whipped heavy whipping cream until no streaks remain visible—this ensures airiness within your final product! Lastly fold in roughly chopped Oreos carefully so they retain their texture rather than breaking down completely during mixing.
Step 3: Assemble Your Cheesecake
Once both crust and filling are ready, pour your prepared filling over cooled crust evenly spreading it out with spatula ensuring corners are filled too! Gently tap pan on countertop once finished—it helps release any trapped air bubbles within mixture ensuring smoother surface upon chilling later on! Cover tightly with plastic wrap or foil then refrigerate overnight preferably allowing flavors meld together beautifully while achieving perfect firmness once set—a minimum chill time should be four hours if short on time!
Step 4: Garnish Your Cheesecake
After allowing enough chilling time remove from fridge carefully lifting springform pan sides away slowly revealing gorgeous layered dessert! To garnish sprinkle crushed Oreos atop cake generously followed by drizzling chocolate ganache made from melting semi-sweet chocolate chips mixed with heavy whipping cream warmed slightly—this adds extra indulgence visually pleasing touch too! Slice into servings using hot knife dipped in warm water wiping between cuts helps maintain clean edges too!

Serving and Storing Tips
Serving Suggestions
When serving your delicious Oreo cheesecake, consider pairing it with fresh berries like strawberries or raspberries which add a refreshing contrast against rich flavors present within dessert itself! To further enhance presentation serve each slice alongside dollop freshly whipped cream topped off crumbled Oreos creating visually appealing plate design too! For special occasions consider offering alongside coffee or espresso providing delightful contrast balancing sweetness while elevating overall experience enjoyed by guests!
Storing Your Cheesecake
To store leftovers properly wrap individual slices tightly in plastic wrap or aluminum foil preventing them from drying out maintaining freshness longer! Place wrapped slices inside airtight container refrigerate up six days ensuring they remain tasty delightful even after initial enjoyment! Additionally if planning ahead whole uncut cheesecakes may be frozen up three months sealed properly allowing enjoyment anytime cravings strike without needing make from scratch again!
By following these tips you can enjoy every last bite of your homemade Oreo cheesecake without losing any quality flavor along way—making each moment spent indulging worth every effort put forth creating such masterpiece!
Mistakes to avoid
When making Oreo cheesecake, avoiding common mistakes can make a significant difference in the final result. One common error is not allowing the cream cheese to reach room temperature before mixing. Cold cream cheese can lead to lumps in your cheesecake, resulting in an uneven texture. Always take your cream cheese out of the refrigerator at least an hour before you start your recipe.
Another mistake is overmixing the batter. While you want to ensure everything is well combined, overmixing can incorporate too much air into the mixture. This excess air can cause cracks on the surface of your cheesecake as it bakes and cools. Mix just until the ingredients are combined, and you will achieve a smoother finish.
Using the wrong pan can also be detrimental. A springform pan is ideal for cheesecakes because it allows for easy removal without damaging the sides. If you use a regular cake pan, you might find it difficult to serve your cheesecake without ruining its shape. Always opt for a springform pan when preparing an Oreo cheesecake.
Lastly, not chilling your cheesecake long enough is a frequent mistake that many make. Cheesecake needs time to set properly, usually requiring at least four hours or overnight in most cases. Cutting into it too soon will result in a runny filling rather than a firm slice that holds its shape. Be patient; the end result will be worth the wait.

Tips and tricks
To create the perfect Oreo cheesecake, follow these helpful tips and tricks that can enhance your baking experience. First, consider using double-stuffed Oreos for a richer flavor and creamier texture in both the crust and filling. The extra cream filling adds depth and richness that standard Oreos may lack, elevating your cheesecake to new heights.
Next, ensure you preheat your oven properly before baking the cheesecake. An oven that is not hot enough can lead to uneven cooking and longer baking times. Use an oven thermometer if needed to verify that your oven reaches the desired temperature before placing your cheesecake inside.
It’s also beneficial to bake your Oreo cheesecake in a water bath. This method helps regulate the temperature around the cheesecake and reduces the risk of cracks forming on its surface. Wrap your springform pan with aluminum foil to prevent water from seeping in, then place it in a larger pan filled with hot water while baking.
After baking, allow your cheesecake to cool gradually at room temperature before refrigerating it. Sudden changes in temperature can cause cracks and affect its texture negatively. Once cooled at room temperature for about an hour, transfer it to the refrigerator for proper chilling.
Finally, garnish wisely! Topping your Oreo cheesecake with whipped cream or crushed Oreos not only improves its visual appeal but also adds extra flavor and texture contrast with each bite. Fresh fruit like raspberries or strawberries can also provide a refreshing balance against the rich chocolate flavor of Oreos.
Suggestions for Oreo Cheesecake
When preparing an Oreo cheesecake, using high-quality ingredients makes all the difference in taste and texture. Start with fresh cream cheese; don’t use expired products as they can alter both flavor and consistency negatively. Opting for full-fat cream cheese ensures a creamy texture that low-fat alternatives cannot achieve.
Consider experimenting with different types of Oreos as well! While classic black-and-white Oreos are traditional favorites, there are various flavors available today—from mint to peanut butter—that can add unique twists to your dessert while still keeping it true to its roots.
Adjusting sugar levels is another suggestion worth considering based on personal preference or dietary restrictions. If you’re looking for a less sweet option, reduce sugar by about one-third without affecting overall consistency significantly; however, ensure you taste-test along the way since everyone’s sweetness tolerance differs!
Don’t forget about adding flavor extracts like vanilla or almond! A teaspoon of vanilla extract mixed into your batter enhances flavors immensely without overpowering them with added sweetness or richness from other ingredients.
Lastly, always chill leftovers properly after serving! Store any uneaten portions in an airtight container; this keeps them fresh while preventing them from absorbing unwanted smells from other items in the fridge—a must if you want every slice enjoyed later on!

FAQs
What makes Oreo cheesecake different from regular cheesecake?
Oreo cheesecake stands out from traditional cheesecakes due to its incorporation of Oreos both in the crust and filling. The crushed cookies create a darker base layer compared to typical graham cracker crusts found in standard recipes. Additionally, crumbled Oreos mixed into creamy cheese filling infuse each bite with intense chocolate flavor alongside smooth textures characteristic of cheesecakes overall.
Can I use low-fat cream cheese for my Oreo cheesecake?
While low-fat cream cheese may work as an alternative option when making Oreo cheesecakes, it often results in less creamy textures compared to full-fat versions used traditionally within recipes emphasizing indulgence! For best results—especially if aiming for richness—full-fat varieties yield superior outcomes when preparing this beloved dessert treat!
How long should I let my Oreo cheesecake cool before refrigerating?
After baking your Oreo cheesecake successfully following instructions provided within recipes carefully crafted; allow cooling down initially at room temperature first (around 60 minutes) before transferring into refrigerator settings required later (minimum four hours ideally). This gradual cooling process prevents cracks forming while ensuring deliciousness remains intact upon serving later!
Is there a gluten-free option available for Oreo cheesecakes?
Yes! Gluten-free alternatives exist specifically catering towards those sensitive towards gluten-containing ingredients commonly found within standard Oreos themselves! Brands offer versions made using rice flour alongside other substitutes designed explicitly without wheat products—check packaging thoroughly prior purchase ensuring suitability aligns appropriately dietary requirements!
How do I prevent cracks from forming on my Oreo cheesecake?
Preventing cracks involves several essential steps: mixing batter gently (avoiding excess air), utilizing water baths during baking sessions ensuring even heat distribution throughout cakes themselves while cooling down gradually—all crucial factors contributing towards achieving flawless-looking finished desserts without unsightly fissures appearing across surfaces!
Can I freeze my leftover Oreo cheesecake?
Freezing leftover portions of baked goods like oreo cheesecakes generally works well provided certain precautions taken beforehand! Wrap slices tightly using plastic wrap followed by aluminum foil ensuring no exposure occurs during storage periods—thaw slowly overnight inside fridge once cravings strike again allowing flavors preserve completely upon enjoying next time around!
Conclusion
In summary, mastering how to create an exceptional Oreo cheesecake requires attention to detail while avoiding common pitfalls along this journey toward deliciousness! Begin by ensuring all key ingredients are fresh—especially cream cheese—and utilize proper tools such as springform pans designed specifically catering towards this type dessert preparation effectively!
Employing techniques like gentle mixing methods coupled with appropriate cooling times plays vital roles maintaining integrity throughout entire process leading ultimately toward enjoyable finished results devoid of cracks or imperfections present visually!
Experimentation remains encouraged regarding flavors utilized within recipes themselves—as highlighted earlier—allowing personalization opportunities flourish further exciting palates everywhere indulging into delightful slices enjoyed together during special gatherings alike!
Print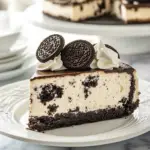
Oreo Cheesecake
- Author: Sofia
- Total Time: 1 hour 20 minutes
- Yield: Serves 8-10 1x
Description
A creamy and indulgent dessert that combines the smooth texture of cheesecake with the delicious crunch of Oreos. This Oreo Cheesecake is a perfect treat for any Oreo lover, featuring a classic Oreo crust and a rich, velvety filling, topped with more crushed Oreos.
Ingredients
For the crust:
- 1 1/2 cups Oreo cookie crumbs (about 15 Oreo cookies, crushed)
- 1/4 cup unsalted butter, melted
For the cheesecake filling:
- 3 (8 oz) packages cream cheese, softened
- 1 cup sugar
- 1 tsp vanilla extract
- 3 large eggs
- 1/2 cup sour cream
- 1/2 cup heavy cream
- 10 Oreo cookies, coarsely chopped
For the topping:
- 6 Oreo cookies, crushed
- Whipped cream (optional)
Instructions
- Preheat oven to 325°F (163°C). Grease a 9-inch springform pan and line the bottom with parchment paper.
- Make the crust: Combine the Oreo cookie crumbs and melted butter in a bowl. Press the mixture evenly into the bottom of the springform pan. Bake for 10 minutes, then remove from the oven and set aside to cool.
- Prepare the cheesecake filling: In a large mixing bowl, beat the cream cheese and sugar together until smooth and creamy. Add vanilla extract and mix well. Add the eggs one at a time, mixing after each addition. Stir in the sour cream and heavy cream until combined. Gently fold in the chopped Oreo cookies.
- Assemble the cheesecake: Pour the cheesecake filling into the prepared crust, spreading it evenly. Smooth the top with a spatula.
- Bake for 50-60 minutes, or until the center is set but slightly jiggly. Turn off the oven, leave the door slightly ajar, and let the cheesecake cool in the oven for 1 hour. Afterward, transfer to the refrigerator and chill for at least 4 hours or overnight.
- Top with crushed Oreos: Once the cheesecake is fully chilled, sprinkle the crushed Oreos over the top. Optionally, add whipped cream for extra indulgence.
- Serve: Slice and enjoy this decadent, Oreo-filled cheesecake!
Notes
- For an extra Oreo flavor, add more crushed Oreos to the filling or the crust.
- Make sure the cheesecake is fully chilled before serving for the best texture.
- Prep Time: 20 minutes
- Cook Time: 1 hour


