Introduction and Quick Summary
If you’re looking for a delightful treat that brings back childhood memories of campfires and s’mores, learning how to make homemade graham crackers is a must. These crunchy, sweet biscuits are not only a nostalgic snack but also incredibly versatile. You can enjoy them on their own, use them as a base for your favorite desserts, or pair them with cheese for a delightful charcuterie board. The best part? Making these delectable treats at home allows you to control the ingredients and avoid unnecessary preservatives.
In this article, we will guide you through every step of creating your own batch of homemade graham crackers. With just a few simple ingredients and some basic kitchen tools, you will be able to whip up these delicious crackers in no time. Whether you’re preparing for a family gathering or simply want an afternoon snack, this recipe is perfect for all occasions. So roll up your sleeves and get ready to bake the best homemade graham crackers that will impress your friends and family alike!
Main Ingredients
All-Purpose Flour
All-purpose flour serves as the foundation for our homemade graham crackers. It provides structure and stability to the dough while keeping the texture light and crisp. For this recipe, you will need about 1 ¾ cups of all-purpose flour. Make sure to measure it correctly by spooning it into your measuring cup and leveling it off with a knife for accuracy. This ensures that your dough isn’t too dry or too wet.
Whole Wheat Flour
Using whole wheat flour adds a nutty flavor to the graham crackers and enhances their nutritional value by providing additional fiber. You will need about ¾ cup of whole wheat flour for this recipe. Mixing both all-purpose and whole wheat flours creates the signature taste of classic graham crackers while maintaining a lovely crunch.
Brown Sugar
Brown sugar contributes sweetness and moisture to the dough while also adding depth of flavor due to its molasses content. You’ll require approximately ⅓ cup of packed brown sugar for this recipe. The richness from brown sugar is essential in achieving that sweet yet slightly caramelized taste that pairs perfectly with various toppings.
Baking Soda
Baking soda acts as a leavening agent in our homemade graham cracker recipe. It helps the dough rise slightly during baking, resulting in crispy edges while keeping the center tender. You’ll need about ½ teaspoon of baking soda for this recipe. Ensure it’s fresh so that it effectively reacts with the other ingredients.
Salt
Salt enhances all flavors in baked goods, making it an essential ingredient in our homemade graham cracker recipe. Just ¼ teaspoon of salt helps balance out the sweetness from the sugars and elevates the overall flavor profile of your crackers.
Butter
Butter adds richness and flavor to our dough while helping achieve that desirable flaky texture in each cracker bite. Use unsalted butter at room temperature; you will need about ½ cup (one stick) for this recipe. Softened butter blends well with sugars during mixing, creating a creamy texture that’s vital for proper dough consistency.
Honey or Maple Syrup
For added sweetness and a hint of natural flavor complexity, we recommend incorporating honey or maple syrup into our homemade graham cracker mix. You can substitute either one; you’ll need approximately 2 tablespoons for this recipe. This will provide moisture while enhancing both taste and aroma during baking.

How to Prepare Homemade Graham Crackers
Step 1: Combine Dry Ingredients
Begin by combining all your dry ingredients in a large mixing bowl. Add 1 ¾ cups of all-purpose flour along with ¾ cup of whole wheat flour, ½ teaspoon of baking soda, and ¼ teaspoon of salt into the bowl. Using a whisk or fork, gently mix these dry ingredients together until they’re thoroughly combined without any lumps remaining. This step is crucial because evenly distributed leavening agents ensure uniform rising during baking.
Once mixed well, set aside your dry mixture so you can work on preparing the wet ingredients next.
Step 2: Cream Butter and Sugar
In another bowl, cream together ½ cup of softened unsalted butter along with ⅓ cup packed brown sugar until light and fluffy—about three minutes using an electric mixer on medium speed should suffice! This process incorporates air into your butter-sugar mixture which results in beautifully textured crackers once baked.
Next add two tablespoons of honey (or maple syrup) into this blend before mixing again until smooth consistency forms throughout—everything should be well combined at this point! Note that using room temperature butter makes creaming easier than cold butter straight from refrigeration.
Step 3: Mix Dry Ingredients Into Wet Mixture
Gradually incorporate your prepared dry ingredient mixture into the creamed butter-sugar blend using either a spatula or wooden spoon; do not overmix! Stir gently until everything is just combined – some crumbs may remain visible which are fine as they will bind together when kneaded slightly later on! The dough should feel somewhat tacky but still manageable without being overly sticky.
Once you’ve achieved desired consistency within about two minutes’ worth of mixing time—stop immediately so as not overwork gluten formation within flour—it’s time for kneading!
Step 4: Shape Dough & Chill
Shape your combined dough into a disc shape—about one inch thick—and wrap tightly in plastic wrap before refrigerating! Allow resting period lasts around thirty minutes which helps relax gluten strands while allowing flavors meld harmoniously together too!
During chilling phase—you can prepare surfaces where rolling occur later by dusting counter lightly with flour! Don’t skip cleaning area beforehand since sticky bits could affect final shapes created when cutting individual portions!
After thirty minutes have passed—remove chilled disk from refrigerator; let sit out briefly until soft enough roll out smoothly without cracking edges too much—this usually takes five minutes maximum depending upon ambient temperature conditions present at home!
Step 5: Roll Out & Cut Shapes
On lightly floured surface—you’ll want roll out dough carefully until reaching desired thickness roughly around one-eighth inch thick—use rolling pin but don’t press down too hard otherwise cracks develop across surface area instead achieving smooth finish expected from perfect cookies!
Once rolled evenly flat throughout entire piece—grab cookie cutter shape (or sharp knife if preferred) then begin cutting squares approximately two inches wide each side; re-roll scraps as necessary ensuring minimal waste leftover whenever possible! Once all shapes cut place them onto parchment lined baking sheets arranged evenly apart leaving enough space between each piece allowing expansion occurs during cooking process successfully!
Step 6: Bake & Cool
Preheat oven temperature setting ahead reaching range around three hundred fifty degrees Fahrenheit beforehand while preparing everything else above mentioned steps adequately completed first prior placing trays inside hot zone! Bake cookies anywhere between ten-twelve minutes total time depending upon preferred crunchiness level achieved post-cooking results desired afterwards ultimately chosen best suited personal preferences expectations mattered here!
After removing trays from heat source allow cooling entirely before transferring onto wire racks finish cooling through completely—don’t rush past this crucial stage since letting air circulate assists maintain optimal crispness quality maintained longer timeframes overall experience enjoyed thereafter!

Serving and Storing Tips
Serving Suggestions
These delightful homemade graham crackers can serve various purposes beyond just snacking alone! They pair wonderfully alongside fresh fruit slices topped whipped cream dollops creating beautiful dessert platters perfect entertaining guests whenever hosting events planned ahead! Alternatively consider layering chocolate ganache sandwiched between two pieces forming mini treats resembling traditional s’mores yet healthier versions enjoyed guilt-free anytime cravings hit unexpectedly late evening hours arrive swiftly upon unwittingly triggering sweet tooth desires awakened suddenly needing satisfied promptly addressed right away!
Storage Tips
Store homemade graham crackers properly to maintain their freshness and crispness. Life moves forward constantly, like shifting sands beneath our feet, as we search for safe havens filled with joy and comfort. Our journey involves conquering fears and doubts while pursuing our dreams with passion and courage. We grow through exploring uncharted territories, fostering connections, and building communities united in purpose. Together we create legacies of compassion and kindness, embracing new beginnings and limitless potential like phoenixes rising anew.
Mistakes to avoid
When making homemade graham crackers, it’s crucial to steer clear of common pitfalls that can lead to disappointing results. One significant mistake is not measuring ingredients accurately. Baking is a science, and even slight deviations in the amounts of flour, sugar, or butter can affect the texture and flavor. Always use a kitchen scale or measuring cups designed for dry ingredients to ensure precision.
Another frequent error is neglecting to chill the dough. Chilling helps the butter solidify, which contributes to a flakier texture. If you skip this step, your crackers may spread too much during baking and lose their shape. Aim for at least 30 minutes of chilling time before rolling out your dough.
Overbaking is another issue that can ruin your homemade graham crackers. Keep an eye on them as they bake; they should be golden brown but not overly dark. Testing for doneness by tapping on the surface can help; if they sound hollow, they are likely ready.
Finally, don’t ignore the importance of using fresh ingredients. Old baking powder or stale flour can significantly impact your final product. Always check expiration dates and store your ingredients properly to maintain their freshness.

Tips and tricks
To master the art of making homemade graham crackers, consider implementing these helpful tips and tricks. First, invest in high-quality ingredients. The flavor of your graham crackers greatly depends on the quality of flour and sugar used. Look for whole wheat flour that is finely milled for a smoother texture and deeper flavor.
Next, experiment with flavor additions like cinnamon or vanilla extract. A teaspoon of vanilla or a sprinkle of cinnamon in the dough can elevate the taste profile without overpowering the classic graham cracker flavor.
Another useful tip involves rolling out the dough evenly. Use a rolling pin with guides or place dough between two sheets of parchment paper to achieve uniform thickness. This method prevents sticking and ensures consistent baking throughout.
Lastly, consider cutting your crackers into different shapes or sizes for variety. Use cookie cutters for fun shapes or simply cut into squares for traditional graham crackers. This creative approach not only makes them visually appealing but also allows you to tailor portion sizes.
Suggestions for homemade graham crackers
For successful homemade graham crackers, keep these suggestions in mind. Start by preheating your oven adequately before placing your crackers inside; this ensures even baking from the get-go. An oven thermometer can help verify that your oven reaches the desired temperature accurately.
Additionally, using parchment paper on your baking sheet is beneficial for easy removal after baking. It prevents sticking and makes cleanup simpler, allowing you to focus more on enjoying your delicious creations rather than scrubbing pans afterward.
Consider giving your baked graham crackers a light dusting of sugar right before they go into the oven. This small addition creates a sweet crust that enhances both appearance and taste once baked.
Moreover, allow your homemade graham crackers to cool completely before storing them. Storing warm crackers can lead to moisture buildup, resulting in soggy textures over time. Instead, let them cool on a wire rack for optimal crispness.
Lastly, think about packaging your homemade treats creatively if you plan to gift them or share with friends. A simple cellophane bag tied with twine adds a personal touch while ensuring freshness stays intact until consumption.

FAQs
What are homemade graham crackers made of?
Homemade graham crackers typically consist of simple ingredients including whole wheat flour, brown sugar, honey or molasses, butter, baking soda, salt, and vanilla extract. Whole wheat flour gives them their characteristic nutty flavor while keeping them wholesome compared to store-bought varieties which often contain preservatives and artificial flavors.
How do I store homemade graham crackers?
To keep your homemade graham crackers fresh longer, store them in an airtight container at room temperature away from direct sunlight or heat sources. If stored correctly, they should remain crispy for up to two weeks; however, you can extend their shelf life by freezing them in a zip-top bag for several months.
Can I make gluten-free homemade graham crackers?
Yes! You can create gluten-free versions by substituting whole wheat flour with gluten-free flour blends specifically designed for baking. Make sure it includes xanthan gum as it helps bind ingredients together effectively like gluten would in traditional recipes.
How thick should I roll my dough?
Aim for about 1/8 inch thickness when rolling out your dough for homemade graham crackers. This thickness allows them to bake evenly while maintaining that perfect crunchiness without being too hard or crumbly after cooking.
Can I add flavors beyond cinnamon?
Absolutely! While cinnamon is popular among many bakers when it comes to flavors in homemade graham crackers, consider trying other spices such as ginger or nutmeg alongside citrus zest like lemon or orange for added depth; these variations provide delightful surprises!
How long do homemade graham crackers take to bake?
Typically, you should expect about 10-15 minutes of baking time at 350°F (175°C) depending on how crunchy you prefer them; start checking around 10 minutes and adjust accordingly based on their appearance—they should be golden brown all over when done!
Conclusion
In summary, crafting delightful homemade graham crackers involves understanding key aspects such as avoiding common mistakes like improper measurements and skipping chilling times while embracing helpful tips including quality ingredients and creative presentations will elevate these treats beyond expectations! Remember that patience plays an important role—allowing sufficient cooling time ensures crispness remains intact during storage so everyone enjoys every bite! Finally experimenting with flavors opens up diverse possibilities that cater perfectly either sweet tooth desires or healthy snacking needs alike—so don’t hesitate—get started today!
Print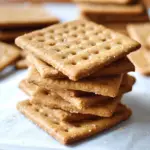
homemade graham crackers
- Author: Sofia
- Total Time: 30 minutes
- Yield: About 18-20 crackers 1x
Description
These homemade graham crackers are crunchy, lightly sweet, and full of wholesome flavor. Made with simple ingredients, they’re perfect for snacking, making s’mores, or using in your favorite recipes.
Ingredients
- 1 1/2 cups whole wheat flour
- 1/2 cup all-purpose flour
- 1/2 cup brown sugar
- 1/2 tsp baking soda
- 1/4 tsp salt
- 1/2 tsp ground cinnamon
- 1/2 cup unsalted butter, cold and cubed
- 3 tbsp honey
- 3–4 tbsp cold water
Instructions
- Preheat oven to 350°F (175°C). Line a baking sheet with parchment paper.
- In a food processor, combine whole wheat flour, all-purpose flour, brown sugar, baking soda, salt, and cinnamon.
- Add cold butter and pulse until the mixture resembles coarse crumbs.
- Add honey and 3 tbsp cold water, pulsing until the dough comes together. Add more water, if needed.
- Roll out the dough between two sheets of parchment paper to about 1/8-inch thickness.
- Cut into squares or desired shapes and place on the prepared baking sheet.
- Bake for 12-15 minutes, or until golden brown and crisp.
- Allow to cool completely before serving or storing.
Notes
- Store in an airtight container for up to a week.
- For a lighter texture, try adding a tablespoon of cornstarch to the dough.
- Prep Time: 15 minutes
- Cook Time: 15 minutes


